Thursday, August 19, 2010

How many Sheets of drywall in my design with contingencies?

You may have created a number of schedules in Revit but have you attempted to create whats called a calculated value?  This is how we can begin to extract quantities of information from those intelligent families we have been told give us a ton of information from our BIM model.  I'm going to show you how to create a very simple one for quantities of drywall which can be adapted and changed for many other calculation values coming from a Revit model.

First we will begin by creating a wall schedule from a model that has already a number of different walls created in the Revit platform.  Once those walls are defined and created we will go to the Views tab on the ribbon were we will choose the schedules option and select to create a Schedule/Quantities type.


From the category list make sure you select the wall category and then select ok.

In the schedule properties dialogue box you will now be able to choose from the list on the left what types of fields you would like to add to your schedule.  At this point we need to make sure we add the "Area", "Family and Type", "Level", "Length","Cost" fields.
Go to the Sorting and Grouping tab in the schedule properties and make sure you have enabled the "Grand Totals" parameter.
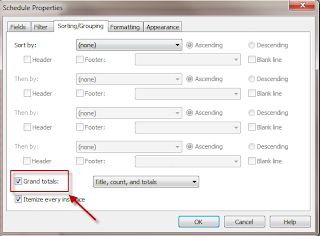


Hit Ok, and you will have a new schedule created listing all the wall families that have been created in your design.  Everything up to here is pretty much standard for schedule creation, now we must take it a step further.
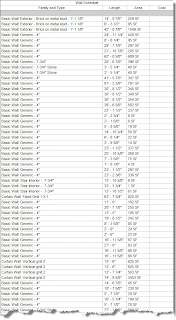


On the left hand side of your screen go to properties and click on any of the tabs listed, each will take you to the specific tab of the schedule properties where we began to define our Schedule/Quantities. 


Make sure you go to the "Fields" tab and there you will find the calculated value button. This is where we will begin to create a more intelligent schedule.  


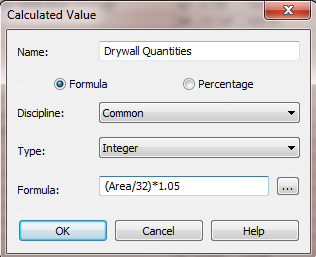
This will open a new dialogue box that will allow you to create a brand new field which you will call Drywall Quantities.  Notice how we defined this as a formula type and made sure that the type was an integer.  The formula portion of the formula is case sensitive, so make sure if you write the name of the field "Area" you make it with a capital"A" otherwise it will  to know which filed to look for.  The idea in the formula creation is very much along the same line of the excel formula process.  I also added a contingency value for waste which is 5%.


Hit Ok, and you will now see a new column in your schedule that has the quantities of drywall per wall.


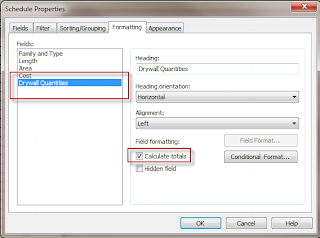
Take it a step further and you can go to the formating tab on the left hand side of the properties screen and select the name of the field and choose the calculate totals which will give you an over all total of all the drywall for a particular design.  I should mention that at this point it is including all types of walls, even those which may not have drywall actually as part of the assembly, so you can take it further by adding filters by family and this will give you a more detailed idea of quantities 


Hope you found this tip useful.

Solar Radiation Preview plug in


When creating a conceptualization model in Revit you can now use the same radiation analysis that is used inside the Ecotect platform(not as detailed but good nonetheless).  This will enable architects to get a better understanding of how the orientation of their design will be affected by the solar radiation thereby creating a better sustainable design that will consider heating and cooling loads for the life cycle of the building.

Check the link below that will allow you to download this great plug in from the Autodesk labs website.

Solar Radiation Plug In

Cheers,

Wednesday, August 18, 2010

Revit Architecture 2010 Crash known Issue

I just helped a client with an issue that has been having problems starting up their Revit Architecture 2010 software.  Apparently its an Autodesk known issue so if your having this problem too, go to the following link and follow the instructions of the document which may help.

Autodesk Revit Architecture 2010 Crash Issue

Hope this helps.


Cheers.

Controlling Wall Materials through Base & Top line extensions

If you have gone through the process of developing a wall type in Revit, then you may have noticed that there was little to no control for these materials when it comes to defining offset distances from the top or bottom of the level the walls are placed on.

This can only be done if you create a base/top line extension parameter.  To create this parameter first you must go to the type parameters of a wall type you want to modify.


Then go to the wall assembly by selecting the "structure" parameter button.

Once there make sure that your preview window is turned on and that you have the view set to section view which will activate the lower portion of the edit assembly window.  Otherwise you will not be able to continue with the next steps.  I also prefer to zoom in on the upper or lower portion of the wall depending on which part of the material you are trying to modify.


Select the modify button, then when you bring your mouse into the preview window you will see that the lower or upper portion of each material will be highlighted as you place your cursor over the bottom or top of each material.  Click on one material and then you will see an icon which looks like a lock become visible.  If you click on the lock it will be change its display from looking locked to unlocked.

This will now create a new parameter within the properties of the wall that will be visible after you leave the type properties dialogue box and go to the instance parameters of the wall.


Now in section if you select the wall some new arrow grips will be visible that will allow you to manually adjust the height of the newly unlocked material allowing more control for material placement making your wall assemblies more realistic to true construction design.

I created the brick ledge on the lower wall using a wall reveal with the default profile size that is given.  You can apply a specific reveal within the properties of the wall if you want, but thats another blog all together.

Tuesday, August 17, 2010

Revit Structure 2011- Checking for Rebar Interferences


As part of the Subscription Extensions there is now the ability to verify that your reinforcement design is correct by running a reinforcement interference check via the extensions manager.  This is assuming you have access to the subscription website which is available to Autodesk clients(previously a great sales tool to get the latest and greatest software as its released) now an even better tool to keep up to date with all the new stuff being developed.

First you must begin by placing reinforcement within the properties of concrete structural members via the extensions manager.  Select each member individually and go to the extensions manager to define what type of member is going to be reinforced.


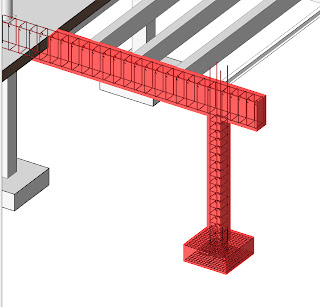
First place the beam reinforcement based on what ever layout rules and type of rebar you require from the Revit library.:


Place column reinforcement and Footing reinforcement again, based on layout rules that suit your structural design.


After all the reinforcement for a typical structural bay has been defined, then you can now run an reinforcement interference check for the selected families.  This intereference check will verify that there is no overlapping geometry based on your rebar placement, thereby reducing unnessary collisions with your rebar layout.

I always like to make my rebar be visible in the 3D view, this can be done by selecting the rebar families and then going to the visibility states in the properties and making sure that its visible as a solid in the 3D view.  Anything in 3D is always good as far as I'm concerned.
Select the members that you want to run the check on:


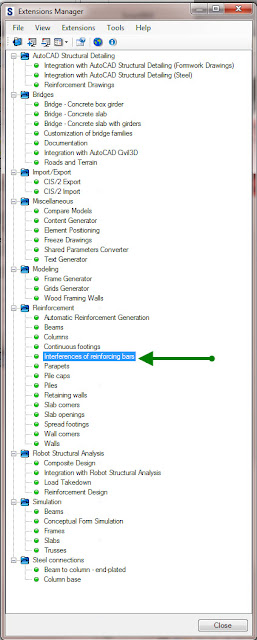
Selcect the Interference Check of reinforcing bars from the extension manager list of extensions

This new window will show you a list of all the interferences tht occur within the family and with any other adjacent family that also has reinforcement embers assigned to it.

These results can then be exported out to word, or excel, hope you like this extension.


Wednesday, November 25, 2009

DWF add-on for Firefox

The DWF functionalty is something that many people use for sharing info internally or externally in their office workflow.  Autodesk Labs website has released an add-on that allows for he firefox browser users to be able o navigate and view DWF files like the Internet Explorer.


Yet another ever changing workflow, that helps the world become flatter!!!!!

http://labs.autodesk.com/utilities/firefox_adr/

Folow the attached link to be able to see it for yourself.

Wednesday, October 28, 2009

Subscription Advantage Pack's

Another great reason why being part of subscription is getting all the new extensions that are released periodically.  Now, there is a new Subscription Advantage Pack.  There is one download per Revit flavour and there are some pretty cool additions to the platforms.  The one that I like the most is for Revit Architecture which allows for stud modeling to occur.  This has always been a question when talking about wood framing in residential designs, and we always left it alone.  Now, we can in fact model that actual stud framing for a wall, and openings, very cool!!!.

I would suggest that you go to your Subscription webpage and have a look at the new Advantage Packs to see what the new extensions are all about.